Applying Patches and Updates with Group Policy

Recently, Adobe published security bulletin APSB08-15 that affects almost all versions of the Adobe Reader and could allow attackers take control of a machine. Since most corporate computers have Adobe Reader installed, patching a vulnerability like this quickly and efficiently is crucial. If the computers running Adobe Reader are part of a Windows 2000 (or later) domain, then you can easily utilize the Active Directory’s Software Installation feature to push this patch out. Deploying updates and patches through Group Policy is easier than you think and can save you hours of work.

Note: You can use Group Policy to deploy any application update, as long as the patch is available as a MSI file. We’re just using this particular patch as an example.

Since the Adobe Reader Updates comes in an executable instead of an MSI, we need to first extract the MSI file. Luckily, Adobe does give you the steps needed to do this here. After following those steps, you will have a folder which includes the MSI and some other needed files. Put these on a share that all computers can reach. It is generally a good idea to give everybody READ access to this share and the underlying NTFS permissions.

Next, we need to open Active Directory Users and Computers. Right click on an OU you want this to apply to, in our case it is called “Workstations”. Then choose properties and click on the “Group Policy” tab.

Now you should see a list of GP objects that apply to that group (if any). Click “New” to create a new policy. Give it a descriptive name such as “Security Update for Adobe Reader”. Click on it and choose “Edit”.

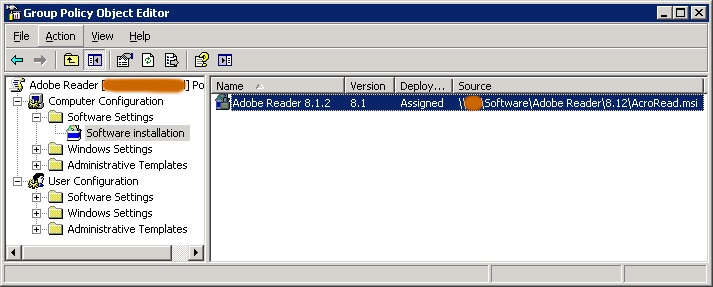
GroupPolicySoftwareInstallation.jpgThe Group Policy Editor will now come up and allow us to choose the options we want. Expand “Computer Configuration” -> “Software Settings”. Then, right-click “Software installation” and choose New -> Package.We need to browse to the network share (e.g. \\YOURFILESERVER\SoftwareUpdates) that contains the MSI file for Adobe Reader, then pick the MSI file and click Open. It will ask you which deployment method to use, you can choose Assigned for this. Remember that this file share needs to be accessible to all computers that need to install this update.

The newest version of Adobe Reader will now be deployed to that group. You can also assign that Group Policy to other groups of computers that you want it to apply to.

Using a mechanism like Group Policy to deploy application updates has several advantages of course:

  1. It’s included with Windows for “free”, so there is no additional cost.
  2. Updates are installed automatically, no reason to physically touch the workstation.
  3. The updates are always installed, you don’t have to rely on the users to patch their applications

Most updates that are assigned to computers are installed when the computer reboots, so it will take a day before this update will be installed. If you are running EventSentry, then you can use the Software Inventory feature to make sure that the update has been installed on all computers.

P.S.: You can also deploy Firefox this way using FrontMotion’s Firefox MSI.

Gateway IP Monitor Update with DynDNS update feature

I’m happy to briefly announce the release of Gateway IP Monitor v1.40 which includes the ability to update a DynDNS host name. We received many feature requests over the last few months, and the ability to update a DynDNS host name was probably the most important one. This feature has been on the list for quite some time, and we finally got around to adding it.

We also cleaned up the user interface (we now have icons!), fixed a few bugs and added the ability to customize the email message.

Remember that Gateway IP Monitor runs as a service and can perform a variety of actions upon an IP address change:

  • Sends an email (SSL support)
  • Updates a DynDNS host name
  • Executes a program
  • Logs the IP address to a file

Remember that we offer support for Gateway IP Monitor through our forums, and please do send us feedback.

Enjoy!

NTToolkit Update with three more utilities: CheckDB, CheckURL and NTPClient

We decided to release a new version of our free NTToolkit to which we added three useful new utilities and fixed a few minor bugs. You will find that some of these utilities can already be used in conjunction with the Application Scheduler feature of EventSentry, extending its monitoring capabilities to verify database connections, web pages and more.

1. CheckDB
CheckDB, as the name implies, checks a database connection through ODBC. This lets you not only verify that a database server is up, but can also check that a database is online and you can optionally run a SQL statement of your choice.

2. CheckURL
CheckURL is the HTTP version of CheckDB, and allows you to detect changes in web pages (through checksums) and looks for text inside web pages. With CheckURL you’ll know when a web page changes or when a particular string is or is not included in a page.

Both CheckDB and CheckURL can log output either to the console or the event log, making it easy to receive alerts from both utilities through EventSentry or any other log monitoring software for that matter.

The application scheduler feature of EventSentry can already log output from command-line utilities to the event log, even when those applications are not “event log aware”. This feature is extremely convenient for SysAdmins that run a lot of scheduled scripts, since the output from a script can immediately be sent to you – for example via email.

But back to the NTToolkit. The third new utility is NTPClient.

3. NTPClient
NTPClient retrieves the time from a NTP server and optionally adjusts the local time to match that of the server. NTPClient supports the NTP up to version 3 and takes network latency into consideration when setting the local time. Please note that NTPClient does not run as a service, and as such will have to be called repeatedly if you wish to keep the time of a computer synchronized.

EventSentry v2.90 will actually include a new System Health feature based on this utility and allow you to keep the local time of a monitored computer in sync.

As always, we hope the three new utilities will help you get your job done more easily.

We have more software releases planned for this summer. EventSentry 2.90 will be released in early July and we will also be releasing a new version of AutoAdministrator (2.0), in June/July with a completely re-designed interface and several new features. I will report more on that in late June prior to the release.

Event 4964: Special Groups Feature for Vista + Windows 2008 Entrepreneurs

There is certainly a lot of talk about the benefits of using Vista, but a lot of administrators and users seem to be avoiding it and instead hold on to Windows XP – which now appears to have a better reputation than ever! Well, here is a small reason to upgrade to Vista or Windows Server 2008.

Microsoft introduced a new event, 4964, called the Special Groups Feature. The purpose of this feature is to log event 4964 to the security event log when a member of a group you specify logs on to a computer.

So let’s say you want to know when a member of a local Administrator group logs on to a computer (and with EventSentry you could get an email when that happens for example), then you can accomplish that with the special groups feature.

In order to use this feature you need to do three things:

  • Determine the SID of the group(s) you want to monitor
  • Specify the SID(s) of the groups you want to monitor in a registry key
  • Ensure that you are auditing the Special Logon Feature (enabled by default)

One way to obtain the SID of a group is to use the getsid.exe tool which is part of the Windows XP SP2 Support Tools and other Microsoft Resource Kits. Note that the primary purpose of this tool is to compare the SID of two user accounts (so it requires you to specify two user/group accounts), but you can just enter the same group name twice to get around this. Here is an example output of the tool:

getsid \\mydc “Domain Admins” \\mydc “Domain Admins”

The SID for account BUILTIN\
Domain Admins matches account BUILTIN\Domain Admins
The SID for account BUILTIN\Domain Admins is S-1-5-21-9817441204-4587651373-9817264971-512

As you can see you need to point to tool to computer where the group exists, in our case I used a domain controller since I want to monitor if somebody from the Domain Admins group logs on to the computer. If you monitor a built-in group (e.g. Administrators) then you will see that the SID is much shorter and the same across all your computers.

Now that we know the SID, we can specify it in the registry. Navigate to key HKEY_LOCAL_MACHINE\System\CurrentControlSet\Control\Lsa\Audit and create a new String with the name SpecialGroups.

The value for this new string will be the SID of the group you want to monitor, and you can separate multiple SIDs with a semicolon. For example:

S-1-5-32-544;S-1-5-32-123-54-65

You do not have to reboot after making this change, it is effective immediately with the first subsequent login. The event that is being logged will look similar to this (screen shot from the EventSentry Web Reports):

Special Groups Logon 4964 ScreenshotThe relevant information is shown in the lower part of the event in the New Logon section. Security ID shows the user that logged on, and Special Groups Assigned shows the group the account is a member of (of course this group has to be specified in the registry).

Voila. This feature probably makes most sense on critical servers, though I would recommend enabling it on all workstations as well since you probably want to know if a member of the local Administrators group logs on. But of course this also means that you need to be running Vista on your network :-).

Since this feature needs to be activated using the registry, you can use AutoAdministrator to push this registry change to multiple computers. AutoAdministrator has actually been rewritten from scratch and we will be releasing a new version 2.0 very soon.

Event Log Message Files (The description for Event ID … cannot be found)

Anybody who has used the built-in event viewer that comes with Windows more than once, has probably seen the message “The description for Event ID ( 50 ) in Source ( SomeService ) cannot be found. The local computer may not have the necessary registry information or message DLL files to display messages from a remote computer.” when viewing certain events. This message occurs more often when viewing events on a remote event log, but it appears often enough on the local machine as well.

event_message_id_cannot_be_found.pngI will explain this dubious error message here, but before I do I will explain how messages are in fact logged to the event log. After reading this you should have a much clearer picture about how applications log to the event log and how you go about troubleshooting this “error”.

The framework that Microsoft created for the event log, back in the NT 3.51 days, was actually quite sophisticated in many ways – especially when compared with the more simplistic Syslog capabilities (though Syslog still has some unique features).

A key feature of event logging in Windows is the fact that an application, at least when using the event log framework in the way it was intended to be used, will never actually directly write the actual message to the event log – instead it will log only the event source and event id, along with some properties such as category and insertion strings. The framework also supports multiple languages, so if you open an event on a French Windows, then the event will display in French (of course assuming that the message file from the vendor supports that) instead of English.

Let’s look at an example – using EventSentry – to understand this better. When EventSentry detects a service status change, it will log the event 11000 to the event log that reads something like this:

The service Print Spooler (Spooler) changed its status from RUNNING to STOPPED.

When EventSentry logs this event to the event log, you would expect that the application does (in a simplified manner) something like this:

LogToEventLog(“EventSentry”,
101000, “The service Print Spooler (Spooler) changed its status from RUNNING to
STOPPED.”);

However, this is NOT the case. The application logging to the event log never actually logs the message to the event log, instead the application would log something similar to this:

LogToEventLog(“EventSentry”,
101000, “RUNNING”, “STOPPED”);

(Note that the above example is for illustration purposes only, the actual code is somewhat more complicated)

So, our actual string from the event message is nowhere to be found, and that’s because the string is embedded in what is referred to as the “Event Message File”. The event message file contains a list of all events that an application could potentially log to the event log. Here is what an event message file looks like before it is compiled:

MessageId=10100
SymbolicName=EVENTSENTRY_SVC_STATUSCHANGE
Language=English
The status for service %1 (%2) changed from %3 to %4.
.
Language=German
Der Dienststatus von Dienst %1 (%2) aenderte sich von %3 auf %4.
.

Notice the numbers contained in the string that start with the percentage sign. These are placeholders for so-called insertion strings, and they make it possible to make the event log message dynamic, since an application developer can’t possible account for all imaginable error message or information that might be accumulated during the runtime of the application. For example, an application might log the name of a file that is being monitored to the event log, clearly this can’t be embedded into the event message file.

Instead, the application can insert strings (hence, insertion strings) into the event message during run time. Those strings are then stored in the actual event log, along with all the other static properties of event, such as the event id and the event source.

Event message files are usually DLL files, but event resources can also be embedded in executables – as is the case in EventSentry, where all events are contained in the eventsentry_svc.exe file. This is generally a good idea, since it reduces the number of files that have to be shipped with the software and it also prevents you from “losing” the message DLL.

You can browse through all embedded events in a message file by using the event message browser that is included in the free EventSentry SysAdmin Tools which you can download here. Simply launch the application, select an event log (e.g. Application), select an event source (e.g. EventSentry), and browse through all the registered event messages, sorted by the ID.

So now that we know how Windows handles event messages internally, we can go back to the original problem: “The description for Event ID ( 50 ) in Source ( SomeService ) cannot be found.”. The Windows Event Viewer logs this message for one of the following reasons:

* No message file is registered for the source (e.g. SomeService)
* The registered message file does not exist or cannot be accessed
* The specified event id is not included in the message file

If the message file is not registered, then this is probably because the application wasn’t installed correctly, or because it has already been uninstalled by the time you are trying to view the event message. For example, if the event message was logged before the application was uninstalled, but you are viewing the event after the application was uninstalled, then you will see this message.

If the event you are trying to view is important, then you can try to fix the problem yourself by either fixing the registry entry or locating the missing event message file.

The registry location depends on only two factors: The event log [EVENTLOG] the event was logged to as well as the event source [EVENTSOURCE].

HKLM\System\CurrentControlSet\Services\Eventlog\[EVENTLOG]\[EVENTSOURCE]

(Replace [EVENTLOG] and [EVENTSOURCE] with the respective values, and view/add/edit the value EventMessageFile. This is the value that points to the message file)

If this value doesn’t exist, then you can add it as either a REG_SZ or a REG_EXPAND_SZ value. You can specify multiple message files with a semicolon.

regedit_eventmessagefile.pngIf the message file specified in the value doesn’t exist, then you can simply copy it into the appropriate location – assuming you can get a hold of it that is :-). Oracle is notorious for not including the message file, in particular with the Express Edition.

A final note on message files for those of you haven’t had enough yet: You can use message files not only to translate event messages, but also for categories, GUIDs and more. Some of the values you might find (mostly in the security event log) are CategoryMessageFile, GuidMessageFile and ParameterMessageFile.

Well, this article turned out a lot longer than I had anticipated, but hopefully you will have a better understanding as to why this message is logged and what you can do about it.