A Better & Faster Ping

The fping.exe utility has been part of the NTToolkit for a few years, with the “f” standing for “fast”. As you may have guessed, the purpose of the tool was to offer a faster way to ping remote hosts. The tool was inspired by Linux (and other Non-Windows Operating Systems), where pinging a remote host (especially one that is online) is lightning fast. Back then I wrote fping as part of an exercise to get a better handle on ICMP and network programming as well. The original fping utility uses raw sockets to send (and receive) ICMP packets, without utilizing any external networking libraries.

Using raw sockets has a few disadvantages however, as it requires administrative access, and on Vista and later an elevated (=administrative) command prompt – often an inconvenience. I decided erase those inconveniences and also add a few new options to the tool while I was at it – in order to make fping even more useful for IT pros.

Introducing fping v1.2 with the following new functionality:

  • 1. Administrative rights or elevated command prompt no longer required
  • 2. Play sound (4 built-in sounds supported) on success and/or failure
  • 3. Supports simple Solaris-like mode
  • 4. Fully customizable, and stores presets

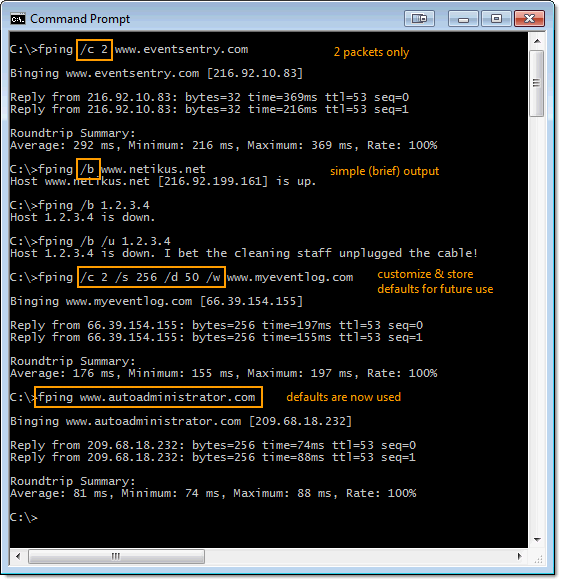
fping_output_with_comments.png

Play Sound
Now you may wonder why on earth you would want your ping utility to play sounds, other than to annoy your coworker(s). I often find myself in a situation where I’m rebooting a server remotely, which more often than not takes longer than I’d like it to. So rather than stare at the fairly monotonous ping output, wouldn’t it be nice if you could just let your ping utility run in the background and “hear” when the server is back up? That’s exactly what this feature is designed for (unless, of course, your coworker(s) NEED to know when you ping a host). You can tell fping when to play a sound either when a ping was successful, or when a packet was lost – so it works either way. So if you’re troubleshooting or monitoring an unstable link, you can tell fping to “ding” when a packet is lost.

For those who like choice, there are 4 built-in sounds to choose from.

Simple Output
More often than not I just want to know if a host is up or not. I don’t need to send 4 packets and I don’t need to know the average, minimum and maximum round-trip time. Simple mode does just that, it tells you whether a host is up or not. Solaris(c) systems do that by default, and it’s a nice feature. You can also use the /u switch with the brief output.

Customization

Most ping utilities (including fping) are very customizable. You can control the number of packets, the packet size, sound, display mode and the delay. But everybody uses tools differently. Some people like to send 2 packets, others 6. Some people want details, some people like it simple. With fping, you simply set your preferences (e.g. 2 packets, 64 bytes, small delay, verbose output, sound on success, etc.) and store it as the default. Now every time you run fping again, it will use those defaults – no reason to remember command line switches. Want to divert from the defaults? No problem: Anything you specify on the command-line will override the default(s), or you can clear the defaults with one simple switch.


Download
This latest version of fping.exe is not yet included in the official NTToolkit installer and is only available in the nightly NTToolkit zip folder. You can download it from the Free Downloads section at netikus.net, just look for “Nightly Download”. This zip file contains the latest stable versions of all NTToolkit utilities.


As always, let us know if you have any suggestions for fping, or any of the other NTToolkit utilities.

How to make the Windows Software RAID log to the event log

Windows Server has long provided admins the ability to create a software RAID, enabling redundant disks without a (potentially expensive) hardware RAID controller. If you are already using Windows Server 2008’s software RAID capabilities, and think that Windows will somehow notify you when a disk in an array fails, then you can skip to “Just say something!” below.

Background
Creating a RAID can all be done from Disk Management view in the Computer Management console, without any scripting or command-line tools.

Software RAIDs are not as powerful and fast as their hardware counterparts, but are nevertheless a good way to enable disk redundancy. Software RAIDs make sense in a variety of scenarios:

•    When you are on a budget and don’t want to spend a few hundred $$ on a hardware RAID controller
•    When you need to enable redundancy on a server that wasn’t originally designed with redundancy in mind (as if that would ever happen!)
•    When you need to add redundancy to a server without reinstalling the OS or restoring from backup

Windows Server lets you do all this, and it’s included with the OS – so why not take advantage of it? The last point is often overlooked I think – you can literally just add a hard disk to any non-redundant Windows server and create a mirror – with less than dozen clicks!

Since this article is starting to sound like a software raid promotion, and for the sake of completeness, I am listing SOME of the advantages of a hardware RAID here as well:

•    Faster performance due to dedicated hardware, including cache
•    More RAID levels than most software RAIDs
•    Hot-plug replacement of failed disks

•    Ability to select a hot spare disk
•    Better monitoring capabilities (though this article will alleviate this somewhat)

But despite being far from perfect, software RAIDs do have their time and place.

Just Say Something Please!
Unfortunately, despite all the positive things about software RAID, there is a major pitfall on Windows 2008: The OS will not tell you when the RAID has failed. If the RAID is in a degraded state (usually because a hard disk is dead) then you will not know unless you navigate to the Disk Management view. The event logs are quiet, there are no notifications (e.g. tray), and even WMI is silent as a grave. Nothing. Nada. Nix.

What’s peculiar is that this is a step back from Windows 2003, where RAID problems were actually logged to the System event log with the dmboot and dmio event sources. What gives?

Even though a discussion on why that is (or is not) seems justified, I will focus on the solution instead.

The Solution

Fortunately, there is a way to be notified when a RAID is “broken”, thanks in part to the diskpart.exe tool (which is part of Windows) and EventSentry. With a few small steps we’ll be able to log an event to the event log when a drive in a software RAID fails, and send an alert via email or other notification methods.

Diskpart is pretty much the command-line interface to the Disk Management MMC snap-in, which allows you to everything the MMC snap-in does – and much more! One of the things you can do with the tool is to review the status of all (logical) drives. Since we’re interested as to whether a particular RAID-enabled logical drive is “Healthy”, we’ll be looking at logical drives.

So how can we turn diskpart’s output into an email (or other) alert? Simple: We use EventSentry‘s application scheduler to run diskpart.exe on a regular basis (and since the tool doesn’t stress the system it can be run as often as every minute) and generate an alert. The sequence looks like this:

•    EventSentry runs our VBScript (which in turn runs diskpart) and captures the output
•    When a problem is detected, EventSentry logs an error event 10200 to the application event log, including output from step 1.
•    An event log filter looks for a 10200 error event, possibly looking at the event message as well (for custom routing).

Diskpart
Diskpart’s output is pretty straightforward. If you just run diskpart and execute the “list volume” command, you will see output similar to this:


Volume ###  Ltr  Label        Fs     Type        Size     Status     Info
----------  ---  -----------  -----  ----------  -------  ---------  --------
Volume 0         System Rese  NTFS   Simple       100 MB  Healthy    System
Volume 1     C                NTFS   Mirror       141 GB  Healthy    Boot
Volume 2     D   System Rese  NTFS   Simple       100 MB  Healthy           

disk_management_3_cropped.png

Notice the “Status” column, which indicates that our “BOOT” volume is feeling dandy right now.  However, when a disk fails, the status is updated and reads “Failed Rd” instead:


Volume ###  Ltr  Label        Fs     Type        Size     Status     Info
----------  ---  -----------  -----  ----------  -------  ---------  --------
Volume 0         System Rese  NTFS   Simple       100 MB  Healthy    System
Volume 1     C                NTFS   Mirror       141 GB  Failed Rd  Boot
Volume 2     D   System Rese  NTFS   Simple       100 MB  Healthy           

Technically, scripting diskpart is a bit cumbersome, as the creators of the tool want you to specify any commands to pass to diskpart in a text file, and in turn specify that text file with the /s parameter. This makes sense, since diskpart can automate partitioning, which can certainly result in a dozen or so commands.

For our purposes however it’s overkill, so we can trick diskpart by running a single command:

echo list volume | diskpart

which will yield the same results as above, without the need of an “instruction” file.

The easy way out
The quickest way (though per usual not the most elegant) to get RAID notifications is to create a batch file (e.g. list_raid.cmd) with the content shown earlier

echo list volume | diskpart

and execute the script on a regular basis (e.g. every minute) which will result in the output of the diskpart command being logged to the event log as event 10200.

Then, you can create an include filter in an event log package, which will look for the following string:

*DISKPART*Status*Failed Rd*

If your EventSentry configuration is already setup to email you all new errors then you don’t even have to setup an event log filter – just creating the script and scheduling it will do the trick.

But surely you will want to know how this can be accomplished in a more elegant fashion? Yes? Excellent, here it is.

A Better Solution

One problem with the “easy way out” is that it will not detect all Non-Ok RAID statuses, such as:

•    At Risk
•    Rebuild

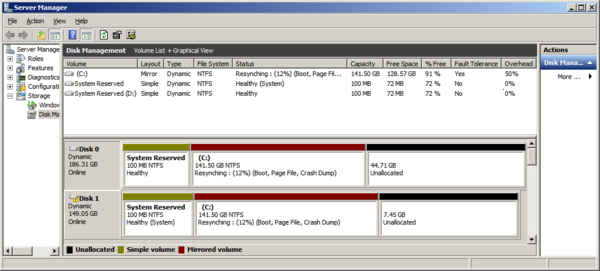
disk_management_resync.pngFurthermore, the output can be rather verbose, and will include any logical drive, include CD-ROMs, removable disks and others.
It is for this reason we have created a VBScript, which will parse the output of the diskpart command with a regular expression, and provide the following:

•    A filtered output, showing only drives in a software raid
•    Formatted output, showing only relevant drive parameters
•    Detecting any Non-Healthy RAID

Alas, an example output of the script is as follows:

Status of Mirror C: (Boot) is "Healthy"

Much nicer, isn’t it? If a problem is detected, then output will be more verbose:

**WARNING** Status of Mirror C: (Boot) is "Failed Rd"

WARNING: One or more redundant drives are not in a “Healthy” state!

The VBScript will look at the actual “Status” column and report any status that is not “Healthy”, a more accurate way to verify the status of the RAID.

Since the script has a dynamic ERRORLEVEL, it’s not necessary to evaluate the script output – simply evaluating the return code is sufficient.

Implementation
Let’s leave the theory behind us and implement the solution, which requires only three steps:

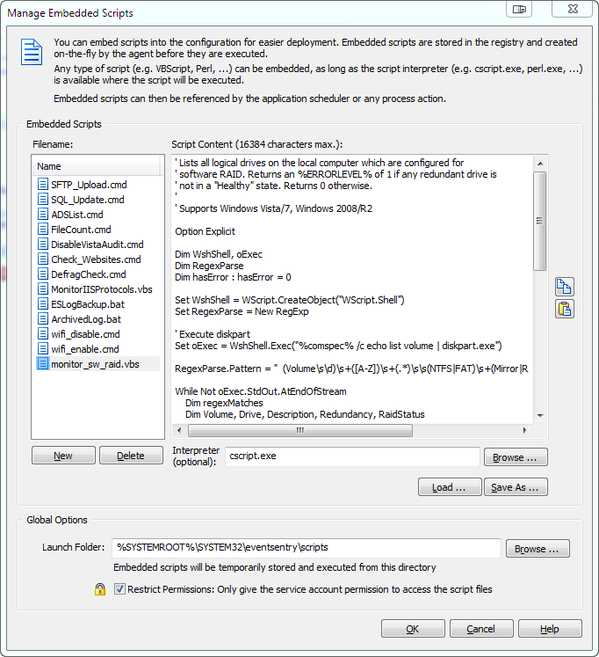
1.    Create an embedded script (we will include this script with v2.93 by default) through the Tools -> Embedded Scripts option, based on the VBScript below. Select “cscript.exe” as the interpreter. Embedded scripts are elegant because they are automatically included in the EventSentry configuration – no need to manage the scripts outside EventSentry.

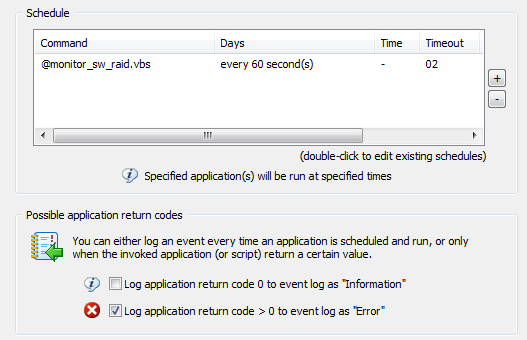
monitor_raid_embedded_script.png2.    Create a new System Health package and add the “Application Scheduler” object to it. Alternatively you can also add the Application Scheduler object to an existing system health package. Either way, schedule the script with a recurring schedule.

application_scheduler_monitor_raid.pngNote that commands starting with the @ symbol are embedded scripts. The “Log application return code 0 to event log …” option is not selected here, since the script runs every minute and would generate 1440 entries per day. You may want to enable this option first to ensure that your configuration is working, or if you don’t mind having that many entries in your application log. It’s mainly a matter of preference.
3.    This step is optional if you already have a filter in place which forwards Errors to a notification. Otherwise, create an event log filter which looks for the following properties:

Log: Application
Severity: Error
Source: EventSentry
ID: 10200
Text (optional): “WARNING: One or more redundant drives*”


The VBScript

' Lists all logical drives on the local computer which are configured for 
' software RAID. Returns an %ERRORLEVEL% of 1 if any redundant drive is 
' not in a "Healthy" state. Returns 0 otherwise.
'
' Supports Windows Vista/7, Windows 2008/R2

Option Explicit

Dim WshShell, oExec
Dim RegexParse
Dim hasError : hasError = 0

Set WshShell = WScript.CreateObject("WScript.Shell")
Set RegexParse = New RegExp

' Execute diskpart
Set oExec = WshShell.Exec("%comspec% /c echo list volume | diskpart.exe")

RegexParse.Pattern = "\s\s(Volume\s\d)\s+([A-Z])\s+(.*)\s\s(NTFS|FAT)\s+(Mirror|RAID-5)\s+(\d+)\s+(..)\s\s([A-Za-z]*\s?[A-Za-z]*)(\s\s)*.*"

While Not oExec.StdOut.AtEndOfStream
Dim regexMatches
Dim Volume, Drive, Description, Redundancy, RaidStatus
Dim CurrentLine : CurrentLine = oExec.StdOut.ReadLine

Set regexMatches = RegexParse.Execute(CurrentLine)
If (regexMatches.Count > 0) Then
Dim match
Set match = regexMatches(0)

If match.SubMatches.Count >= 8 Then
Volume = match.SubMatches(0)
Drive = match.SubMatches(1)
Description = Trim(match.SubMatches(2))
Redundancy = match.SubMatches(4)
RaidStatus = Trim(match.SubMatches(7))
End If

If RaidStatus <> "Healthy" Then
hasError = 1
WScript.StdOut.Write "**WARNING** "
End If

WScript.StdOut.WriteLine "Status of " & Redundancy & " " & Drive & ": (" & Description & ") is """ & RaidStatus & """"
End If
Wend

If (hasError) Then
WScript.StdOut.WriteLine ""
WScript.StdOut.WriteLine "WARNING: One or more redundant drives are not in a ""Healthy"" state!"
End If

WScript.Quit(hasError)

How to dynamically toggle your Wireless adapter with EventSentry

Most of the time I work on a Lenovo laptop running Windows 7, and I’m overall quite happy with the laptop (especially after the mainboard was replaced and it stopped randomly rebooting). However, a minor nuance had been bugging me for a while: If I plugged my computer into a LAN (I have a docking station at work and at home) while a wireless signal was also available (and configured on the laptop), Windows 7 would keep both connections active.

1. The Problem

So I’d have my laptop in the docking station, connected to a 1Gb Ethernet network, and yet the laptop would also be connected to a WiFi network. While not a big deal per se, it does have a few advantages to automatically disable the WiFi connection when already connected to Ethernet:

  • Avoid potential connectivity issues
  • Increase security by not transmitting data via Wifi when not necessary
  • Increase battery life when connected to a LAN
  • Because you can!

Now, Lenovo equips most (if not all) laptops with a software called “Access Connections”, a pretty nifty and free tool! One of the things it can do, is disable a Wireless adapter when the computer is connected to Ethernet. However, it never re-enables it when you disconnect from the wired network (at least I haven’t found a way), and besides not everybody has Lenovo laptop.

So how could I disable the WiFi connection automatically when I connected the laptop to an Ethernet, yet automatically re-enable it when there is no Ethernet connection?

2. The Research

After some intense brainstorming, I remembered two things:

  1. Most Ethernet NIC drivers log event to the System event log when a network port is connected/disconnected.
  2. A while back, I used the netsh command to configure DNS servers from the command line. Maybe one could toggle the state of network adapters with this tool as well?

3. Evidence Gathering

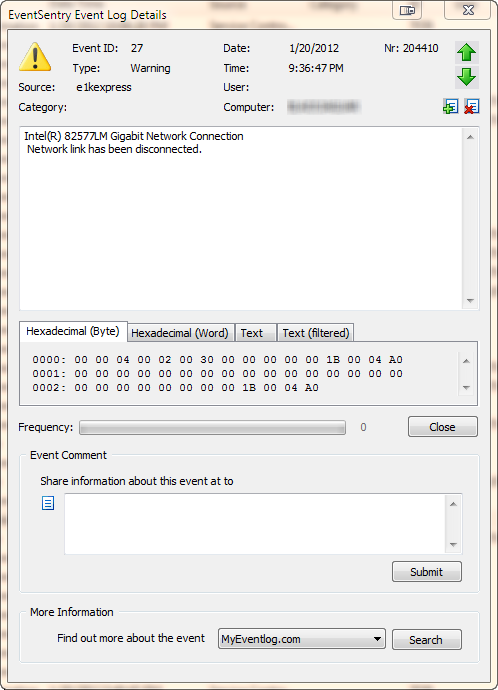
The first one was easy, a quick look at the system event log revealed the following event:

e1kexpress_event.pngA similar event is logged when the “network link” has connected. The event shown here is specific to the driver of my laptop’s network card (an Intel(R) 82577LM adapter), but most newer drivers will log events when a cable is disconnected or the link is otherwise lost. If you are already running EventSentry with its hardware inventory feature enabled, then you can obtain the name of the network adapter from any monitored host on the network through the hardware inventory page, an example is shown below.

all_nics.pngComing up with a way to enable and disable a particular network connection with netsh.exe was a bit more challenging, but I eventually cracked the cryptic command line parameters of netsh.exe.

Enable a connection
netsh interface set interface “Wireless Network Connection” ENABLED

Disable a connection

netsh interface set interface “Wireless Network Connection” DISABLED

And yes, you do need to specify the word “interface” twice. If you do find yourself wanting to automate network adapter settings with scripts and/or the command line frequently, then you should check out this link.

4. The Solution

So now that we have all the ingredients, let’s take a look at the recipe. In order to accomplish the automatic interface toggling, we need to create:

  • an embedded script called wifi_enable.cmd, using the command line from above
  • an embedded script called wifi_disable.cmd, again using the command line from above
  • a process action “Wifi Enable”, referencing the above wifi_enable.cmd embedded script
  • a process action “Wifi Disable”, referencing the above wifi_disable.cmd embedded script
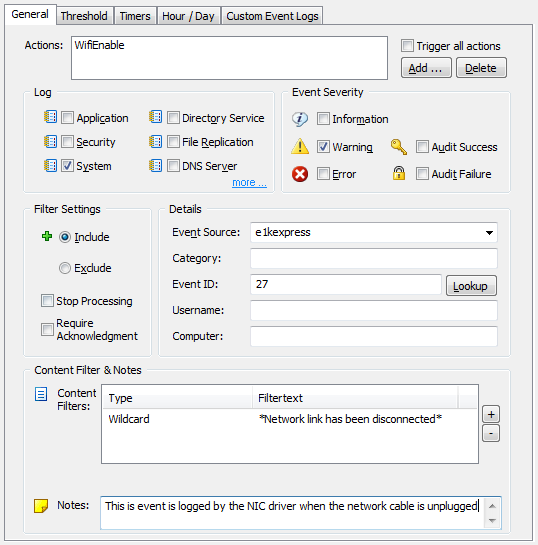
  • an event log filter for event source “e1kexpress” and event id 27, triggering the “Wifi Enable” action
  • an event log filter for event source “e1kexpress” and event id 32, triggering the “Wifi Disable” action

A couple of clarifications: First, you do not need to use embedded scripts, you can create the scripts in the file system too and then point the process action to those files. I prefer embedded scripts since I don’t have to worry about maintaining the script, as it gets distributed to remote hosts automatically when needed. Second, the event source and event id will depend on the network card you have installed on your network, the above example will only work with Lenovo T410 laptops.

So what happens is pretty straightforward: When I connect my laptop to a LAN, the Intel NIC driver writes event id 32 with the event source e1kexpress to the system event log. EventSentry intercepts the event and triggers the Wifi Disable action, which in turns runs the netsh.exe process, disabling the WiFi connection.

5. Setting it up in the management console

Embedded Scripts

You can manage embedded scripts via Tools -> Embedded Scripts. Click “New”, specify a descriptive name (e.g. wifi_enable.cmd) and paste the command line netsh interface set interface “Wireless Network Connection” ENABLED into the script content window. Then, do the same for the wifi_disable.cmd script, but this time use the netsh interface set interface “Wireless Network Connection” DISABLED command line. You can leave the interpreter empty as long as you give the filename the .cmd extension.

embedded_script.pngActions

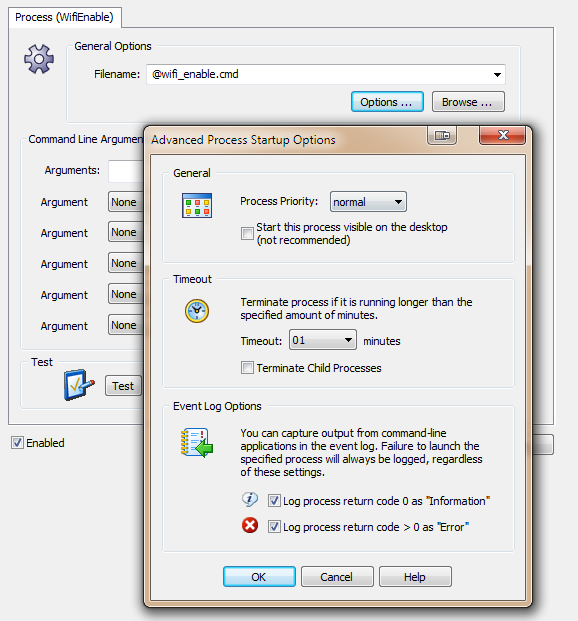
Create two process actions, one pointing to wifi_enable.cmd, and one pointing to wifi_disable.cmd. You can access these embedded scripts by clicking the pull-down – you should see the embedded script(s) you created in step one – each prefixed with the @ symbol. The resulting dialog should look like this:

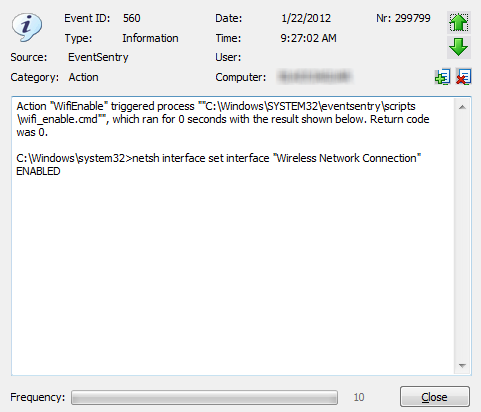
process_wifi_enable.pngI recommend enabling both “Event Log Options”, as this will help with troubleshooting. Now we just need the event log filters, and we are all set.
Like I mentioned earlier, you can also reference any external process or .cmd file with the process action, if you’d rather not use embedded scripts.

Event Log Filters
Since we’ll need two filter, we’ll create a new event log package called “Toggle Wifi” by right-clicking the “Event Log Packages” container and selecting “Add Package”. Inside the package we can then add the two filters: One to trigger the “Wifi Enable” action when the NIC drivers logs its event indicating that the network cable was unplugged, and one that will trigger the “Wifi Disable” action when the NIC drivers logs that the network cable was plugged in. The filter will look similar to this, but note that the event source as well as event id will depend on the network card and driver.

filter_wifi_enable.pngThat’s pretty much it. If you enabled the event log options in the process action earlier, then you can see the output from the process action in the event log, as shown below:
event_action.pngHere are some links to the official EventSentry documentation regarding the features used:

EventSentry v2.92 + iPhone App

EventSentry v2.92
The main new features in version 2.92 are:

  • Network Services component
  • Embedded performance / environment charts
  • HTTP action
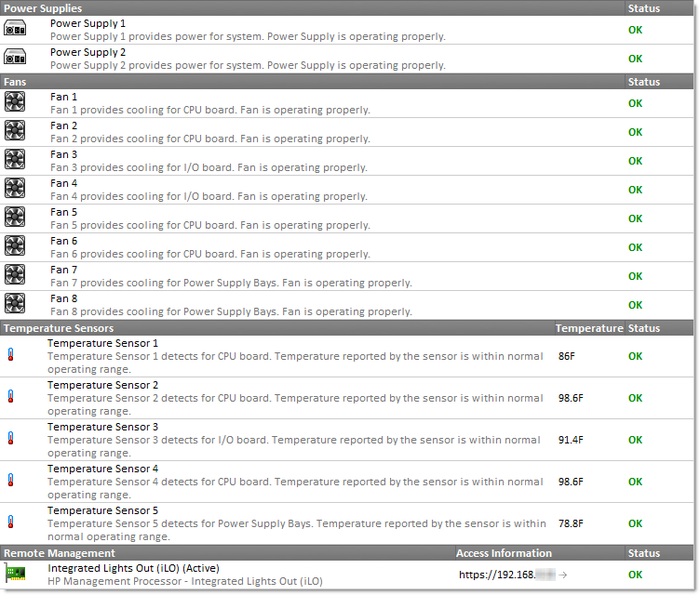
  • Hardware Inventory & Monitoring

Please see the release history or the documentation for a complete list of all bug fixes and new features.

Network Services
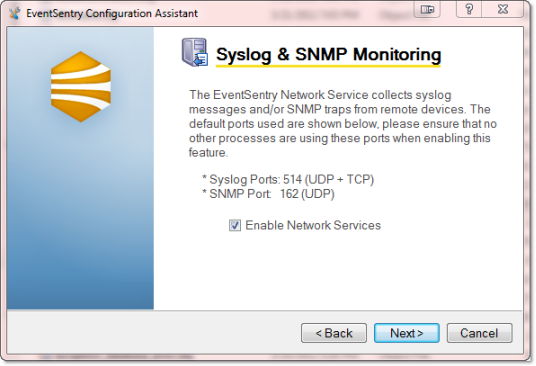
The network services component is the main new feature in EventSentry, and adds powerful functionality – the ability to receive SNMP traps – to our monitoring solution. Any network device that supports SNMP v1, v2c or v3 can be configured to send traps to EventSentry, which can then either forward the trap details via email, or log them to the database for archival and searching purposes.

Unlike other products, configuring the snmp trap daemon is easy and uncomplicated. Simply specify any MIBs you want to load, configure any SNMP communities and/or v3 users, and (optionally) setup text filters to include/exclude specific traps based on their content.

The network services component now also includes the syslog daemon, which was previously embedded in the EventSentry agent. This change includes higher availability, since the network services will cache incoming (snmp and/or syslog) packets if the main database is temporarily unavailable.

Another new “feature” is the ability to run the network services daemon on Linux and OS X operating systems. We developed all code in the network services to run on multiple platforms, and will continue to do so with all upcoming new components in EventSentry. Cross-platform functionality is still experimental, and as such we don’t currently have an installer for non-Windows operating systems. If you are interested in running the network services daemon on Linux or OS X, then please send a request to our support team.

Visualizing performance and environment data with embedded charts
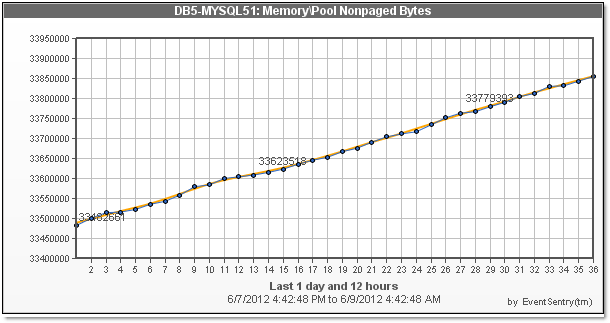
Performance monitoring and alerts have always been a popular and useful feature in EventSentry, but a numerical alert can only convey so much information. If an alert shows that the CPU usage has been exceeded, say 80% over a time period of 10 minutes, then it is often helpful to see the performance data in a chart. This would show whether the CPU usage spiked during the beginning of the 10-minute interval and is back in an acceptable range, or whether the CPU usage has been mostly constant. In the past, you would need to review the performance history through the web-based reporting (which is still an option and desirable for long-term analysis), but starting with v2.92 email alerts can now include an embedded chart which shows exact performance information from the monitored time interval.

For example, if your performance alert is configured to generate an alert when the CPU usage exceeds 90% for more than 30 minutes, then you can receive an attachment in addition to the text alert, showing performance data from the last 30 minutes.

eventsentry_attachment_performance.pngEmbedded charts are also included with temperature and/or humidity environment alerts, an example chart is shown below:

eventsentry_attachment_environment.png

HTTP Action
To better interact with web-based solutions like iService, EventSentry now includes a new notification type: HTTP. With the new HTTP action, you can submit event data to any HTTP or HTTPS-based form, making it extremely easy and reliable to interact with web-based systems (e.g. ticketing systems). Setting up a HTTP action is easy: Simply provide the URL, authentication and specify any event fields that you want to submit.

Hardware Inventory & Monitoring
Also new are network link speed monitoring, which can alert you when the NIC speed changes. This can be useful if a host is accidentally connected to a different switch, or simply to inventory all network connections.

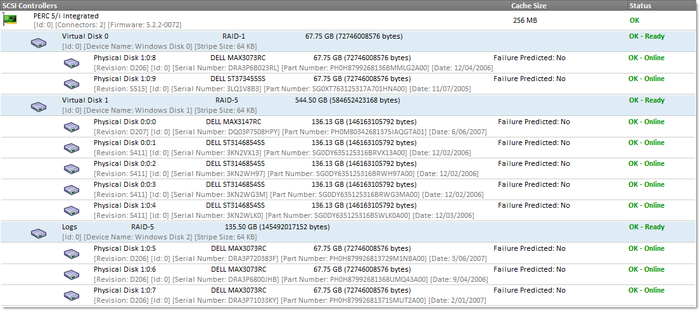
EventSentry also monitors connected USB storage devices and can alert you when a drive is added or removed. The S.M.A.R.T. status of drives is also monitored, and junction points are now taken into consideration when evaluating the disk space of a logical drive. Also new is a “physical disks” section in the web reports.

iPhone App
Why yes, there is an app for that! How convenient would it be to review the health status of all your monitored hosts from your iPhone – including health statistics, hardware details and more?

Dream no more, with the EventSentry iPhone app you can review the status of all your servers from your phone (so long as it has access to your web reports of course).

Upon launch the app shows a searchable list of all monitored hosts and their respective health status. Tapping on a host will show detailed information, such as performance data, hardware information and more. Please take a look at the official iTunes page for the EventSentry app for more information and screenshots.

If you are an Android user then there is no reason to worry, an Android version of the EventSentry Mobile app is planned later this year.

Again, please see the version history for a complete list of features and fixes in v2.92.