EventSentry 5.1.1.104: Security, Security, Security!

Everybody wants to have a more secure network – and everybody has various tools at their disposal to at least improve the security of their network. But which tool is the best for the job, and where do you start? The answer to this question is somewhat easier (and more structured) for organizations that have to adhere to compliance frameworks (ISO, CMMC, PCI, SOC, …), but a little harder for business that have no such requirements.

EventSentry has long included many tools to increase the security of your network, and in the latest 5.1.1.104 update we made it significantly easier to increase the security of your infrastructure with 3 new dashboards:

The security dashboards will guide you through the process of:

  • Ensuring your audit settings are correct
  • Identifying insecure settings on your network
  • Illustrating significant changes that should be reviewed

So how do you get started? After applying the latest patch, head over to the web reports and load any dashboard and hit the SPACE bar – the new security dashboards will show up in the list and you can import them there.

After the dashboards are imported, click on the Dashboard in the menu and select the first one: “Dashboard [1] Foundation”. This dashboard simply evaluates all of your audit policies to make sure they are adequate. Proper auditing is crucial, and is the foundation for many other monitoring initiatives.
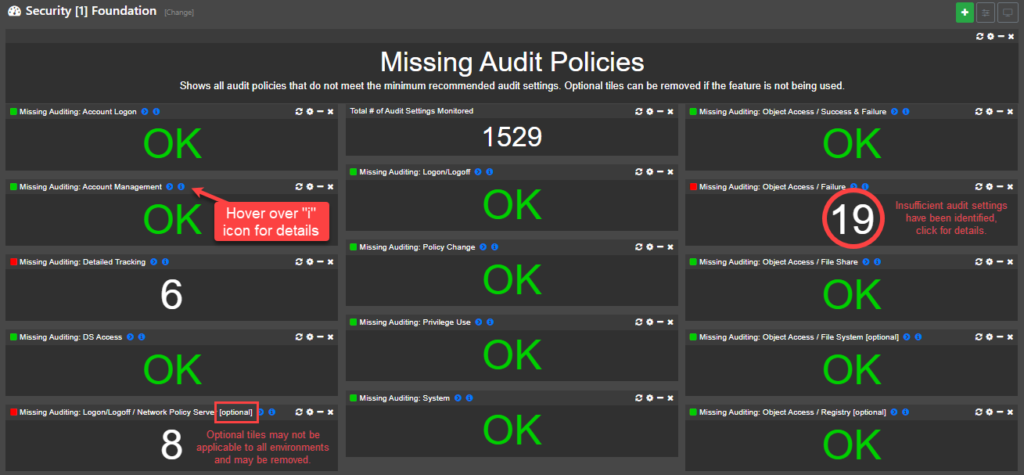
Important: You can click on the header of each imported dashboard to navigate to a KB article, which explains the purpose of the dashboard in detail and how to resolve any identified issues.

It’s recommended to configure audit settings via group policy, to ensure that settings are always enforced and apply network-wide. You will know that your audit settings are correct when all tiles on this dashboard are “OK”. Please keep in mind that it may take an hour before new audit settings are pushed by GPO to your end points and subsequently picked up by EventSentry. Detailed information about this dashboard is available here.

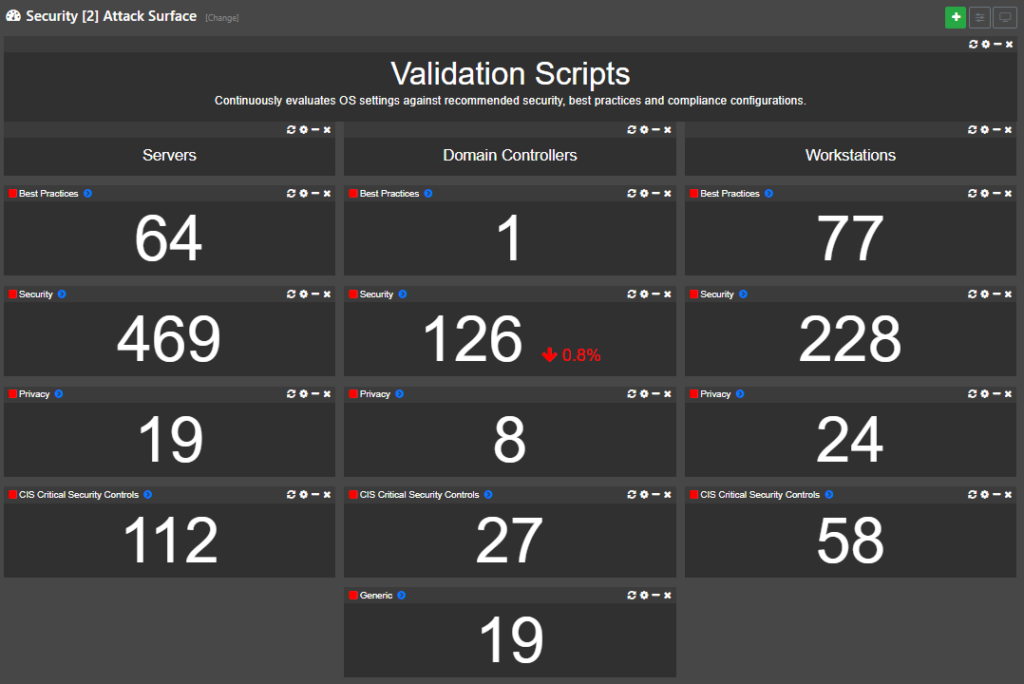
Once your audit settings are in the clear you can graduate to dashboard #2 – Attack Surface. This dashboard utilizes various validation scripts to ensure that your monitored hosts follow best practices and/or pass security and compliance requirements. The checks are generally divided into different categories like

  • Best Practices
  • Security
  • Privacy
  • CIS Critical Security Controls

Most findings on this dashboard can usually be resolved via group policy and/or registry settings. The end result is a reduced attack surface of your network since your monitored hosts will now adhere to recommended best practices and security recommendations. More information about this dashboard can be found here.
The last dashboard, “Security [3] Critical Changes” illustrates critical changes that have occurred on your network (and domain) recently. This dashboard should be reviewed daily and will reveal important changes like

  • Services/Drives/Scheduled Tasks added
  • Software Installed
  • Recent logon failures
  • Important AD changes

Patch 104 also includes improvements to the names of built-in event log packages, which have been consolidated and given better, more descriptive names. As such, expect a lot of changes if you do a package update in the management console.

Another useful improvement is that you can now easily access information about security events with a new “info” button in the management console.

If you’re running EventSentry 5.1 then download the latest patch and make sure to install & review the new security dashboards!
Reliable SMS Alerting with the SMSEagle

Note: This article was updated in May 2017 to reflect some of the improvements SMSEagle has made to its devices, most notably support for additional wave lengths and power adapters which make the device work flawlessly in most countries in the world.

Emails are still the alert type of choice for most network administrators, but they come with a major pitfall: They either rely on your local email server, the Internet connection, or worse: both.

So if you need to get notified when your email server or Internet connection are down – and most likely you will want to get notified – text messages (aka as SMS) are a convenient way out of this monitoring conundrum.

Email to SMS, or web-based SMS services can help in some situations, but you need a different kind of beast when the Internet connection is down.

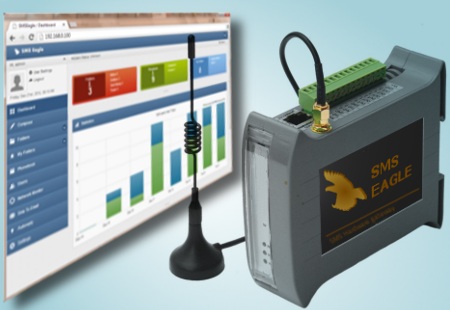
This is where hardware solutions like the SMSEagle come in. The SMSEagle is essentially a cell phone with an Ethernet jack, a web server + API, allowing you to send text messages either through its web interface or API (preferred).

SMSEagle
SMSEagle

The SMSEagle and similar devices usually only require three things:

  • A valid SIM card
  • A physical location with coverage from your provider
  • An Ethernet connection to your network

With the SMSEagle in place, you no longer have to fear loss of Internet connectivity or mail server downtime – a text alert is just a few seconds away when combined with a monitoring solution like EventSentry. In fact, the SMSEagle is somewhat unique in that it actually offers its own basic network monitoring capabilities which can be used in addition to EventSentry – or to monitor the host running the EventSentry Heartbeat Monitor.

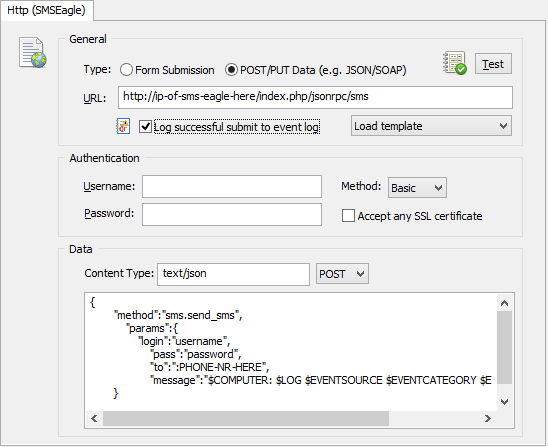
Since the SMSEagle features a web-based API, EventSentry can submit certain alerts, e.g. pertaining to Internet connectivity or the availability of a specific host and/or service, directly to the SMSEagle through its HTTP action, which will then send a SMS alert directly to your mobile device of choice.

The SMSEagle accepts mini SIM cards and works with the UMTS 800/850/900/AWS1700/1900/2100 MHz and GSM/GPRS 850/900/1800/1900 MHz wave bands and thus should work with all major cell providers. The latest models of the SMSEagle also ship with power plugs which will work in most countries, including Europe, the U.S., Australia and many others.

The setup of the device is straightforward: You first insert the SIM card, connect it to the Ethernet and power on the device. The device automatically assigns itself IP address 192.168.0.101 but can also retrieve its IP address via DHCP. More instructions & details are available in the manual.

Once you’ve setup the SMSEagle and verified that SMS messages can be sent and received, you can create an EventSentry HTTP action and point it to your SMSEagle device. The HTTP action includes a number of templates to quickly load all required fields for a specific HTTP API; simply select the SMSEagle from the drop-down and specify all the required fields such as host name and so forth. Use the test button to ensure the action is setup correctly.

EventSentry HTTP Action
EventSentry HTTP Action configured for the SMSEagle

Once the action is setup it can be referenced by one or more filters so that it is triggered under the right circumstances. Assuming that you are already monitoring a host outside your network (e.g. your ISPs DNS server, a public web site) to determine whether your Internet connection is available or not, you would want to look for EventSentry event 11000, which indicates when a host changes its availability status, such as:

EventSentry Heartbeat Alert

Host ispdns (Internet) changed its PING status from OK to ERROR. The reason for the status change was: “100% packets lost”.

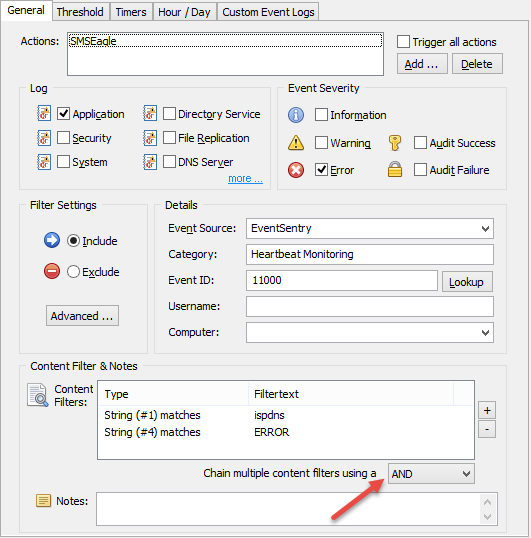
A filter setup for this event would look like something like this:

EventSentry Heartbeat Filter
Filter for EventSentry heartbeat alert

Here, we are looking for an application error generated by the Heartbeat Monitoring category of the EventSentry source. We’re also further restricting the filter to only alert us on status changes of the “ispdns” host when it goes off-line. Since the SMSEagle is listed as the action, this particular event (alert) will be sent to the SMSEagle action.

The insertion strings can be determined by either clicking on the “Lookup” button on the filter dialog, or by clicking on the “Preview” button when adding a content filter.

If you’re located in the Europe or the United States then the SMSEagle is a non-brainer. Otherwise, there are a few other devices out there who work similarly , and as long as they offer a HTTP-based API, integrating EventSentry with them should be easy.

Automatically Restarting a Failed Windows Process

Whether it’s a critical process running on a server or an application on your desktop – sometimes processes terminate and need to be restarted – immediately.

With EventSentry & EventSentry Light you can do just that: Automatically restart processes immediately after they terminate.

In the past, one drawback of EventSentry launching a process was the side effect that any process started by the EventSentry agent would run under the same account as the EventSentry agent itself (usually a privileged domain account or LocalSystem).

In this post I’ll discuss how you can work around that limitation in a secure manner using a scheduled task. When the critical process fails, instead of launching the process directly through a process action, EventSentry will trigger a scheduled task instead. Why? Because scheduled tasks allow you to configure under which user a task will run – and the user’s password is securely stored in Windows.

The recipe for accomplishing this feat is as follows:

  • Process Monitoring monitors the process
  • An event log filter looks for the “failed process” event and triggers a process action
  • The process action starts a scheduled task

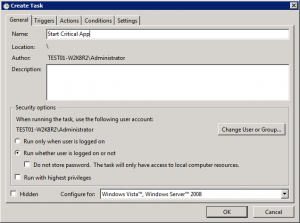
Let’s look at this in detail. First, on the host where the critical but unstable task is running, you create a schedule task in the Windows “Task Scheduler”. Under General, give the task a descriptive name (“Start Super Important App”) and change the user under which the program should be running under. In most cases you will also want to make sure that you configure the task to run whether a user is logged on or not. Then, under “Actions”, add a new action “Start a program” which points to the executable that should be launched. After you click “OK” you will be prompted for the password for the user.

Scheduled Task
Creating a scheduled task

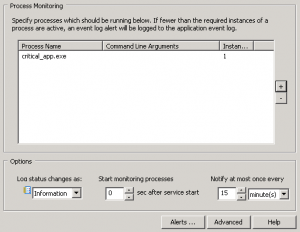
The next step is to setup process monitoring in EventSentry. Right-click “System Health” and create a new package and assign it to the computer(s) in question. Right-click the newly added package and select “Add – Processes”. Click the newly added object and add the name of the process which should be monitored. You can configure how many instances of the processes are required, and with which severity the event will be logged when the process is inactive.

process monitoring
Configuring process monitoring

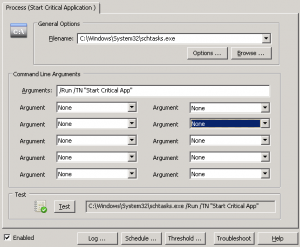
Now we create a new “Process” action. Right-click the “Actions” container, select “Add” and enter a descriptive name (e.g. “Trigger Super Important App”). In the Filename field specify:

%SYSTEMROOT%\system32\schtasks.exe

And for the Command Line Arguments enter:

/Run /TN “Start Super Important App”

This uses the built-in Microsoft utility schtasks.exe to run the task we created in our first step. At this point EventSentry will monitor the specified process and log an event if the process is inactive. And while we do have an action to trigger the scheduled task, we still need to tell EventSentry when to launch that action.

EventSentry Process Action
Configuring a process action to start a scheduled task

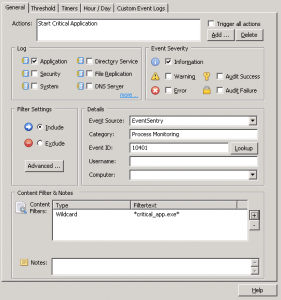
For the next step, right-click the “Event Logs” container, select “Add Package” and give that package a descriptive name. Then assign the package to the same host. Right-click the newly added package and add a filter by clicking “Add Filter”. In the filter dialog, add the “ Trigger Super Important App” action to the action list and configure the following fields:

Event Log Include Filter Rule
Setting up a rule to trigger the process action

Event Severity: Information
Event Log: Application
Event Source: EventSentry
Category: Process Monitoring
Event ID: 10401
Content Filter (wildcard): *critical_app.exe*

Important Notes: The event severity will need to match whichever severity you selected when adding the process monitoring object in the system health package. The content filter can also be configured to match insertion string #1, in which case the wildcards are not necessary.

And that’s all there’s to it, simply save the configuration when you are done. If the process is running on a remote host then don’t forget to push the configuration to that host.

A Better & Faster Ping

The fping.exe utility has been part of the NTToolkit for a few years, with the “f” standing for “fast”. As you may have guessed, the purpose of the tool was to offer a faster way to ping remote hosts. The tool was inspired by Linux (and other Non-Windows Operating Systems), where pinging a remote host (especially one that is online) is lightning fast. Back then I wrote fping as part of an exercise to get a better handle on ICMP and network programming as well. The original fping utility uses raw sockets to send (and receive) ICMP packets, without utilizing any external networking libraries.

Using raw sockets has a few disadvantages however, as it requires administrative access, and on Vista and later an elevated (=administrative) command prompt – often an inconvenience. I decided erase those inconveniences and also add a few new options to the tool while I was at it – in order to make fping even more useful for IT pros.

Introducing fping v1.2 with the following new functionality:

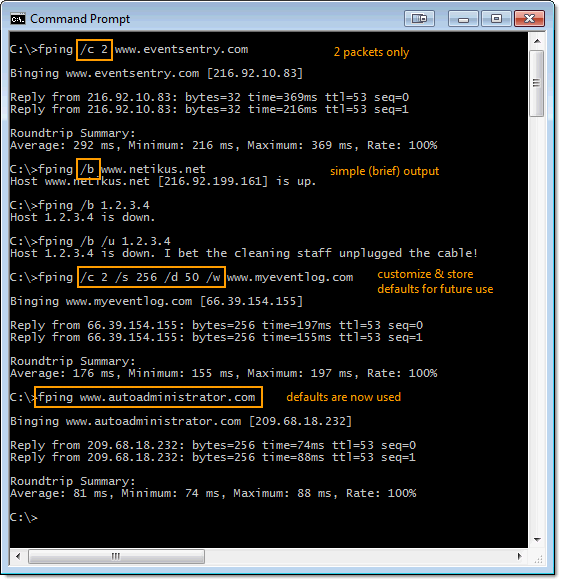
  • 1. Administrative rights or elevated command prompt no longer required
  • 2. Play sound (4 built-in sounds supported) on success and/or failure
  • 3. Supports simple Solaris-like mode
  • 4. Fully customizable, and stores presets

fping_output_with_comments.png

Play Sound
Now you may wonder why on earth you would want your ping utility to play sounds, other than to annoy your coworker(s). I often find myself in a situation where I’m rebooting a server remotely, which more often than not takes longer than I’d like it to. So rather than stare at the fairly monotonous ping output, wouldn’t it be nice if you could just let your ping utility run in the background and “hear” when the server is back up? That’s exactly what this feature is designed for (unless, of course, your coworker(s) NEED to know when you ping a host). You can tell fping when to play a sound either when a ping was successful, or when a packet was lost – so it works either way. So if you’re troubleshooting or monitoring an unstable link, you can tell fping to “ding” when a packet is lost.

For those who like choice, there are 4 built-in sounds to choose from.

Simple Output
More often than not I just want to know if a host is up or not. I don’t need to send 4 packets and I don’t need to know the average, minimum and maximum round-trip time. Simple mode does just that, it tells you whether a host is up or not. Solaris(c) systems do that by default, and it’s a nice feature. You can also use the /u switch with the brief output.

Customization

Most ping utilities (including fping) are very customizable. You can control the number of packets, the packet size, sound, display mode and the delay. But everybody uses tools differently. Some people like to send 2 packets, others 6. Some people want details, some people like it simple. With fping, you simply set your preferences (e.g. 2 packets, 64 bytes, small delay, verbose output, sound on success, etc.) and store it as the default. Now every time you run fping again, it will use those defaults – no reason to remember command line switches. Want to divert from the defaults? No problem: Anything you specify on the command-line will override the default(s), or you can clear the defaults with one simple switch.


Download
This latest version of fping.exe is not yet included in the official NTToolkit installer and is only available in the nightly NTToolkit zip folder. You can download it from the Free Downloads section at netikus.net, just look for “Nightly Download”. This zip file contains the latest stable versions of all NTToolkit utilities.


As always, let us know if you have any suggestions for fping, or any of the other NTToolkit utilities.

Server Virtualization: Physical to Virtual Migration

Despite being around for quite some time now (VMWare released its first version of VMWare Workstation in 2001), server virtualization seems to be all the rage these days. It seems that not a day goes by without seeing virtualization mentioned in a newsletter, magazine or web site.

The first virtualization software product I used was indeed VMWare Workstation, some time around 2002. I used it mainly for testing and development, and the fact that it supported most major operating systems (e.g. Linux) was very helpful. A couple of years later we got our first dedicated server where we ran the VMWare GSX Server (now called VMWare Server). At that time I also evaluated Microsoft Virtual Server, but found it to be inferior from both a management and performance aspect, and it also didn’t support Non-Microsoft Operating Systems. Microsoft Virtual Server has improved since then however and is a viable alternative today.

As virtualization has become more and more important for our business, we have since migrated to the VMWare ESX Server, which supplies its own Linux-based operating system and thus offers a slightly better performance among other benefits. I know this is starting to sound a lot like a VMWare advertisement, so I’ll try to get to the point. Don’t get me wrong, we’ve definitely found problems in VMWare’s products over the years, but its proven to be a stable and reliable platform overall. For example, installing and upgrading ESX Server has thus far not caused us any problems or difficulties. Read Michael’s review of VMWare Server 2 however, he doesn’t appear to have liked the latest release of VMWare Server too much.

One thing that is often overlooked in my opinion however is the ability to migrate physical machines to virtual machines using the free VMWare Converter. Using the converter, you can migrate a physical into a virtual machine, which can run on any of VMWare’s products. How many IT departments are running servers that are barely used anymore, yet cannot be turned off because a handful of users are occasionally accessing the server to access old data? Those machines usually don’t require fast hardware and might even be running on systems that are no longer supported by the manufacturer. Systems like these are ideal candidates for virtualization.

Here are just some of the benefits you get by moving a legacy or underutilized machine to a virtual server:

  1. If you retire (=recycle) the original hardware, you save money on power by requiring less A/C and power consumption in your data center.
  2. You can cancel any maintenance agreements on the hardware if it is retired.
  3. You might speed up the application if the server hosting the virtual machines is more powerful than the original box the software was running on.
  4. If the migration fails or causes unexpected problems, then you have nothing to fear since the original server won’t be modified.
  5. The migration is done remotely, so you don’t even have to physically log on to the computer being migrated.
  6. Virtual machines can be suspended, thus saving RAM on the host machine while suspended.

We performed a similar migration a couple of months ago when we switched to a new support ticketing system. Since we didn’t migrate any data from the previous system to our new system, we wanted to have the ability to login and search tickets periodically – so shutting of and formatting the server was not an option. Of course, keeping the server running 24/7 seemed like waste as well – especially when we wouldn’t need to access the machine more than once a week. Hence, a migration to a virtual machines seemed like the best option and the server lives on ESX Server since. The physical server was initially just turned off for a few weeks, but has since found new use for a different project.

So if you’re planning to move to virtualization or have already begun, don’t just think about new machines but also consider “virtualizing” existing physical machines.

And remember that machines running inside VMWare or Microsoft Virtual Server can be monitored by EventSentry just like a physical machine can. 🙂