Announcing AutoAdministrator v2.0

After launching version 2.90 of EventSentry just a few months ago, we’re excited to announce yet another major software release coming from NETIKUS.NET ltdAutoAdministrator v2.0.

The last update of the 1.x series was released more than four years ago, so we decided to completely re-build it from scratch and add all the features that have been requested by our users since the last release. The result is a powerful tool that makes it unbelievably easy to apply changes to remote workstations and servers. Whether a change or query needs to be applied to one or 100 computers makes little difference with AutoAdministrator.

In a nutshell, AutoAdministrator lets you query or update a variety of Windows settings and services across any number of servers and/or workstations, without the need to create a script or perform the actions manually. Simply select the feature, computers (it integrates with Active Directory) and click start.

Let’s say, for example, that you needed to obtain or set the value of a registry entry across 30 machines. By just using regedit, it would probably take you a total of 15 minutes to connect, retrieve the value, and paste it to an editor/spreadsheet and move on to the next machine. The same task, using AutoAdministrator, could be done in as little as 1 minute.

aa_v20_1.jpg

Querying the “Remote Registry” service status across multiple computers

This is just one example of course, as AutoAdministrator can control services, read/set registry values, query file information, copy/delete files, manage passwords, shutdown/reboot, query logged on users, ping hosts and manage ODBC connections.

As previously mentioned, AutoAdministrator integrates with ActiveDirectory, making it a breeze to manage computers that are part of a Windows domain. You can also pull computers from the Microsoft Windows Network or create custom groups to organize computers inside AutoAdministrator. If you need to connect to remote computers using alternate (administrative) credentials, then you can assign those credentials to any Active Directory OU, group or individual computer item.

The update process itself is fully threaded, making it possible to push updates in a very short time, even to a large amount of computers.

aa_v20_2.jpg

File Management dialog, mirror / copy the
C:\Batch directory to remote computers


Another new feature is the ability to create presets, making it a snap to repeat common tasks. Simply configure the feature (e.g. query service W3SVC), select the computers and save it as a preset. The next time you open AutoAdministrator, you can simply select the preset and click “Update”.

We think that AutoAdministrator is an incredible time-saver for anybody who manages more than 10 computers, whether they are servers or workstations.

Here is a complete list of all features in the new AutoAdministrator:

Ping
Ping computers to retrieve ping statistics.

ODBC
Query, copy or delete System DSNs on remote hosts.

Passwords
Verify, update or reset passwords of user accounts on remote hosts.

Shutdown / Reboot

Shutdown, reboot or cancel a pending shutdown on remote hosts. You can optionally send a message as well.

Services

  • Control any service (Query, start, stop, continue, pause, restart)
  • Change startup type (manual, automatic, disabled)
  • Remove service
  • Change Logon (service can be automatically restarted as well)


Registry

  • Values: Read, add, delete and change
  • Keys: Add, delete
  • Copy entire keys to remote computers

File Management

  • Copy files and folders to remote computers
  • Delete files and folders from remote computers
  • Mirror local directories to remote computers

File Information

  • Query remote files to retrieve its hash, size, attributes, modification time, version, company or description
  • Remote files can be compared against a hash you provide

Logons

  • Show users that are currently logged on interactively to a computer
  • Count the number of users that are logged on (useful for terminal servers)

The scheduled release date for AutoAdministrator is January 12th 2009, and you can request a trial then at https://www.netikus.net/products_trial_request.html. If you can’t wait and would like to download the beta, then simply contact our support team at https://www.netikus.net/about_contact.html.

Happy New Year,
Ingmar.

Your favorite tools and utilities always available everywhere (almost)

If you are managing more than a handful of servers
and workstations in an Active Directory domain then you have probably come to
rely on a small set of utilities to help you with your daily tasks of managing
your servers and workstations. You probably carry those apps with you on a USB
stick (check out PortableApps.com) or have them sitting on some network drive for access when you need them,
and most of these tools are probably from different
developers and vendors.


I personally like a lot of the Windows Sysinternals tools such as
psexec, process monitor, Microsoft Network Monitor and of course the NTToolkit tools that we develop – but
everybody has his or her own preference as to what they need to get the job
done. And that’s exactly my point.


Wouldn’t it be great that every computer you manage –
workstation or server – always had
the tools you need automatically pre-installed? That way, they could be used in scheduled tasks, batch scripts etc. without you having to worry whether the tool is installed or not.


Well, it is possible – and you can do it without spending a
dime – thanks to
Active Directory and the folks at Caphyon in Romania
that provide a freeware edition of their Advanced Installer.


You probably see where I am getting at. Combine a MSI
created by Advanced Installer with your favorite tools and Active Directory’s
“Software Distribution” feature, and you get all your tools at your fingertips
– whenever you need them. In this post I’ll show you how to create a MSI with
your favorite tools and automatically publish that to some or all computers in
your AD domain. This approach also supports updates, so that you can publish
revised MSI packages with new tools and/or updates.


The nice thing about this solution is that the only
prerequisite is Active Directory, and even if you don’t have AD you still end
up with a MSI that you can easily install on any computer.


  1. Download
    & Install Advanced Installer Freeware. You can also go with one of
    their commercial products of course, but the freeware version is enough
    for our purposes here.


  1. Organize
    all of your tools into one location so that they can easily be added to
    the installer. This is not absolutely necessary but will make working on the installer a bit easier.


  1. Open Advanced Installer. It should open a dialog to create a new project. If not, go to File -> New.
  2. Select a project type of Simple and make sure “Use wizard to create the project” is checked.

    advanced_installer_create_project.png

  3. The New Simple Project Wizard comes up. Click next to continue, and give your project a descriptive name.
  4. Browse to the folder containing all your tools.
  5. The next box allows you to create shortcuts to specific programs. If you have any GUI programs in there then you may want to check them and then hit Next.

    advanced_installer_select_source_files.png

  6. Now you can hit Finish on the final screen to build the project. It will save it as a .aip file in the location of your choice.
  7. At this point we can just call it a day and compile the MSI file. I like having my command-line tools in the PATH environment variable however, so that I can access them conveniently from any folder. Keep reading for more info on this, otherwise just skip to step 12.
  8. Click on the “Environment” link in the left panel. Now right click anywhere in the blank space on the left side and choose “New Variable”.
  9. In the screen shot below you can see what settings to use to add it to the Path system variable.

    advanced_installer_environment_variables.png

  10. Now just click the “Build” button to create your MSI file.

Now that you have the MSI file, you can roll it out using Active Directory. If you need a refresher on how to do this, then please see the earlier blog post Applying Patches and Updates with Active Directory that shows how to distribute MSI-based patches with Active Directory – essentially the same concept.

Drawbacks & Considerations

Now, I have to admit that there are some drawbacks to using Active Directory to publish your MSI. Currently, group policy can only apply software installations in the foreground, which means that you will have to reboot a computer in order to have your new MSI installed. If you know a way around that – other than using a 3rd party software deployment suite – then please let me know.

Also keep in mind that any tool you install on your servers and/or workstations will, by default, be available to any user on that machine unless you adjust the permissions of the target folder manually. As such, I would refrain from including utilities in your MSI that make gaining unauthorized access easier, and also ensure that you always have the latest version of your tools in your MSI.

I hope this tip helps managing your servers and workstations a bit easier. Until next time,

Ingmar.

Mr. Fix It: Reviving a relative’s computer

Let’s face it, whether you’re a DBA, IT Manager or sys admin – you are eventually asked the inevitable by your parents, mother-in-law (hint) or brother-in-law: The computer is soooo slow – is there something we can do?

What you will probably find is a computer running Windows XP, an out-of-date Anti Virus software that was pre-installed, missing patches, 17 toolbars for Internet Explorer, some AdWare and a boatload of other software that nobody needs. If it’s bad then you’ll also find some SpyWare and viruses.

It unfortunately requires multiple steps of corrective action to get garbled systems like that back up to normal, and so I created this list for myself so not forget steps along the way. You can change the order, but this order should be most effective. If most of the items listed are obvious to you, then you can still use the list as a simple check list.

1. Uninstall all unneeded software: This should speed up the computer right away and get rid of some of the resource hogs. Don’t forget to get rid of any outdated AntiVirus software as well at this point.

2. Autoruns: Use the Sysinternals Autoruns tool to remove any applications that have nested themselves into one of the many autorun locations. I found the “Logons” and the “Services” tab to be most effective, though I recommend you check all of them. I also recommend saving the current setup prior to disabling things. After a reboot the computer should already be faster.

3. Remove Spyware: It’s generally a good idea to make sure that no Spyware is present, and I recommend running Super Antispyware on the computer. They have a free home edition that works quite well – and don’t get suspicious because of their cheesy web site.

4. Apply Updates: Now it’s time to switch to Microsoft Update and install any available critical updates and hardware updates that are relevant. You can switch to Microsoft Update by navigating to Windows Update and clicking the “Microsoft Update” link on that page on the left or right hand side. I generally recommend including optional updates, such as IE 7 and Windows Media Player as well. They might not use them, but this ensures that they are only using software that is going to be patched.

5. Anti-Virus: If the computer does not have Anti-Virus software installed at this point, download either a free package (e.g. Avast, AVG, etc.) or purchase a commercial one if they don’t mind paying an annual fee. Avast has the option to do an offline virus scan of your hard drive before the system boots, which I found quite useful.

6. Drivers & BIOS: Depending on the age of the system, chances are that at least some drivers are out of date, though it’s much more likely on a new computer than it is on an old one. A first start is Windows Update, but checking the vendor’s web site (some of them come with update software as well) usually yields better results and offers more recent drivers.

7. Defrag: I have a sort of love-hate relationship with defragging tools, and think that the benefits are often overstated. I have however seen many cases over my career where defragging does indeed improve performance. I don’t think a daily defrag is necessary on a workstation, but a computer that has never been defragged in years can definitely benefit from it. I have used Raxco’s PerfectDisk successfully on servers and workstations, and they have a fully functional 30-day trial available.

8. Hardware: In some cases, especially with older systems, it might help to upgrade the hardware. Upgrading memory is usually most effective, since it’s both cheap and easy to install. I listed it as a last step, even though upgrading it right-away might make performing all the other steps more enjoyable (=faster). Don’t just throw memory at the problem though, cleaning the machine up is the most important!

Or, you can do a re-install :-). Depending on the state of the OS, the above steps can sometimes take a very long time, and a re-install might be a better option – especially when the computer is infected with viruses and Spyware. As a matter of fact, if you still have access to the recovery CD and the computer wasn’t overly customized (e.g. used only for email, web and pictures), then a re-install will almost certainly be a better option and take less of your time.

Hope this helps – and if all else fails then you can always install Linux 😉

NTFS Alternate Data Streams: Hiding data in plain sight since 1993

I recently read an article in the Hackin9 magazine (worth taking a look if you haven’t heard about it) about alternate data streams (ADS) in NTFS. I had heard about this hidden feature in NTFS a long time ago actually, but over the years forgot about its existence again.

Background
In a nutshell, the NTFS file system, which was introduced with Windows NT 3.1, supports ADS – sometimes also referred to as “hidden streams”. This means that you can attach or associate any number of files to an existing file, yet those files will not be visible to the vast majority of file management applications – including explorer and the “dir” command (Vista can show ADS with a parameter). One thing I find interesting about streams is that a lot of people in IT do not seem to
know about them, even people otherwise very familiar with the Windows
Operating System.

Now, streams are created and accessed by appending the “host” file name with a colon, followed by the name of the stream. Let’s say you want to create a text file called financials.txt and hide it with winhelp.exe, you would run notepad C:\Windows\winhelp.exe:financials.txt. This will bring up notepad which will prompt you to create the file since it doesn’t exist (since the alternate stream is basically a file). You can then save any text in the hidden file and save it. You will notice that the file you just created will not show up when you do a directory list (dir C:\Windows) and will also not show up in the Windows Explorer. Note that the timestamp of the host file will change however.

Now there are of course a variety of utilities that have been developed in the last 15 (!) years that will allow you to find hidden streams, but more on that later. Hidden streams still exist on Vista and later, though the feature seems to have become more restrictive.

There are apparently no limits as to how many streams one can associate with a file, or the type of file that can be associated. This means that you can associate an executable as much as you can an ASCII file. There are however some limitations as to how user mode applications (e.g. notepad) can access hidden streams. Let’s go back to the previous example where we created the file financials.txt in winhelp.exe. If you open a command prompt and execute type C:\Windows\winhelp.exe:financials.txt, then you will not be able to see the contents of the hidden file. If you use notepad instead however, you will be able to see the file (notepad C:\Windows\winhelp.exe:financials.txt). This is probably because cmd.exe and its built-in commands up until Windows XP are not aware of alternate streams. ON a Windows XP machine I also could not open that same file if I tried to open it from inside notepad with the File -> Open command.

Creating Streams
Things get more interesting when you attach executables to files – and execute them! Let’s say I wanted to hide popular windows game solitaire inside the file C:\Windows\wganotify.log and call the stream “calc.exe”. Here is what you do:

type system32\sol.exe > C:\Windows\WgaNotify.log:calc.exe
start C:\windows\WgaNotify.log:calc.exe

Auditing Alternate Data Streams
Those of you interested in auditing will probably wonder how Windows tracks access to hidden streams in the event log. Well, there is good and bad news. The bad news is that object tracking (the famous event 560) does not show hidden streams, and instead only shows the “host” file name being accessed. Process Tracking on the other hand shows hidden streams in the expected manner. For the above example, a 592 event will show that file C:\windows\WgaNotify.log:calc.exe was executed.

Exploiting Streams
Scary, huh? This opens up a can of worms when you think about malware hiding inside otherwise innocent files – such as a log file. At appears as if most AntiVirus products do not detect hidden streams, at the same time there doesn’t seems to be a significant number of mainstream malware applications out there are that rely on hidden streams. I’m not sure why that is, since this feature seems almost too good to be true for the writer of any malicious applications. One reason might be that malware writers mostly target home machines, and many of those computers are still formatted with the FAT(32) file system, which of course doesn’t support ADS. This might change over time though, as more (home) computers use NTFS as their file system.

So after reading up on ADS, playing around with it last week, scanning my computer for hidden streams, I arrived at the inevitable question: What is the higher purpose of Alternate Data Streams? I mean, many applications don’t support it, most people don’t know about it, and a scan didn’t reveal any hidden streams besides a couple inside some Microsoft installers that apparently use them as some sort of meta data.

As it turns out, ADS was created for compatibility with the Macintosh HFS file system, which uses a data fork and resource fork to store data in a file (OS X now uses the HFS+ file system). But over the years (it’s been 15 after all) some developers at Microsoft decided to utilize this feature. For example, when you specify summary information about a file (right-click -> properties -> summary), then this information will be stored in ADS.

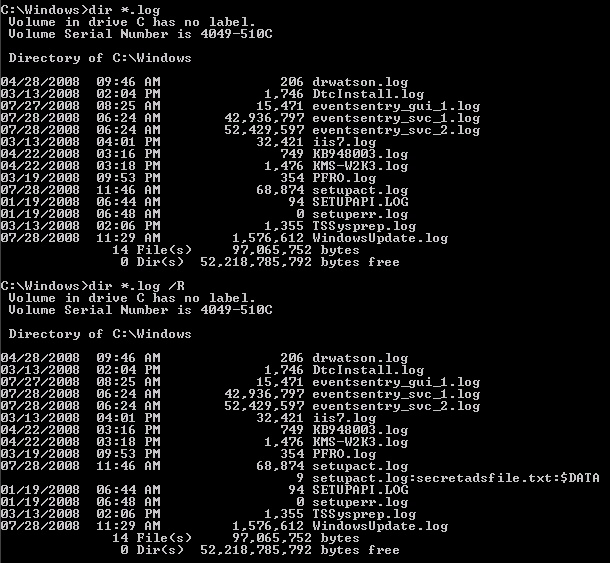
As mentioned earlier, there have been some improvements in regards to ADS with Vista and later. Vista can now show alternate streams with the /R switch of the “dir” command. My preliminary research also shows that hidden streams can no longer be executed in Vista or later – so what we did in the above example will not work. I think that’s a good thing, since there really is no practical reason (unless you develop malware) to do this. The screen shot below shows the output of a regular dir command and the dir /R command on a Windows 2008 server (note the file setupact.log).

ADS_Win2k8.jpgIn my humble opinion, Microsoft should get rid of alternate streams in future versions of Windows, and instead come up with some sort of structured way of embedding meta data in files. Anything contained in meta data should be non-executable and limited in size, e.g. 256kb.

Discovering Streams
So what does all this mean for you, the person responsible for security in your network? How can you find hidden streams and detect if streams are being added to files?

There are many free third-party utilities out there that show and manipulate hidden streams, but the discovery of this feature led us to extend the functionality of the File Monitoring feature of EventSentry to include the automatic detection of hidden streams in real-time. This means that any stream added, modified or removed from a file in a monitored location will be detected by EventSentry.

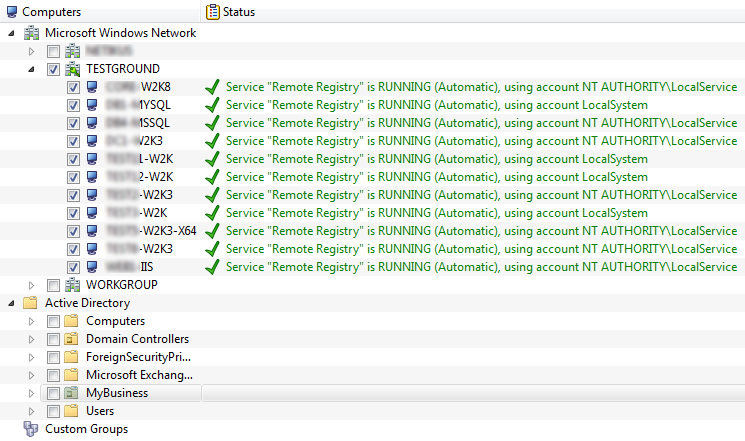
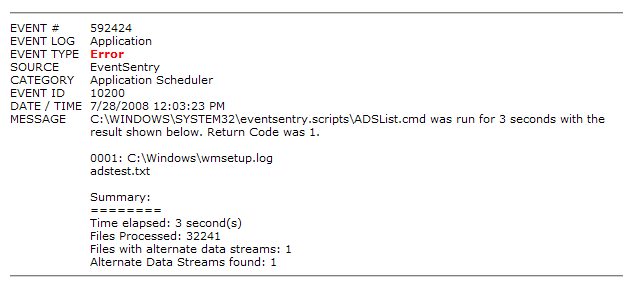
We have also developed a new command-line tool, adslist.exe, that will list all alternate data streams on a directory and optionally its sub directories. The tool is part of the NTToolkit v1.96 and I recommend that you schedule to run this tool with the Application Scheduler feature of EventSentry on a regular basis, or schedule it with the Windows Task Scheduler and email the results (adslist.exe C:\ /s). The advantage of using EventSentry is that the results of adslist.exe can automatically be emailed to you only if alternate streams were found. You can do this because the %ERRORLEVEL% is set to 1 by adslist.exe when one or more streams are found. The screenshot below shows what this would look like in the email sent by EventSentry:

EventSentry_ApplicationScheduler_ADSList.pngManipulating Streams
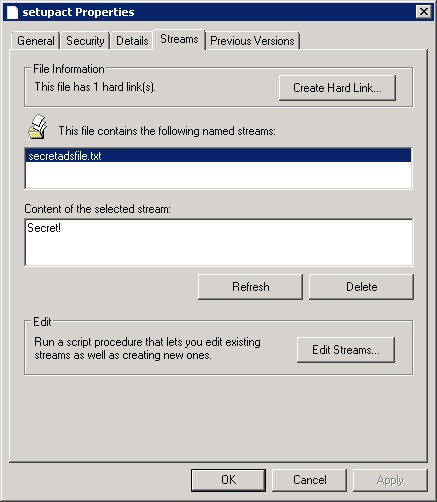
While Microsoft doesn’t offer a tool to search for and discover alternate data streams, they do offer a good explorer-extension that allows you to view and delete alternate data streams. You can download it from https://docs.microsoft.com/en-us/sysinternals/downloads/streams, the zip file contains the source code as well as another utility to create hard links on NTFS volumes. After extracting the archive, navigate to the \StrmExt\ReleaseMinDependency folder and run regsvr32 StrmExt.dll. You will then have an additional tab when viewing file properties in explorer called “Streams”:

StrmExt.jpgAnother way to get rid of hidden streams is to copy a file to a FAT[32] volume and then back to the NTFS volume, or – if you don’t have a FAT[32] volume available – simply compress and uncompress the file again.

Well, I hope this gives you a better understanding of alternate data streams, even if you were already familiar with them. Like I mentioned earlier, it doesn’t appear as if ADS is used for evil in a large scale quite yet (so no reason to panic!), but I believe it is better to be safe than sorry.

Gateway IP Monitor Update with DynDNS update feature

I’m happy to briefly announce the release of Gateway IP Monitor v1.40 which includes the ability to update a DynDNS host name. We received many feature requests over the last few months, and the ability to update a DynDNS host name was probably the most important one. This feature has been on the list for quite some time, and we finally got around to adding it.

We also cleaned up the user interface (we now have icons!), fixed a few bugs and added the ability to customize the email message.

Remember that Gateway IP Monitor runs as a service and can perform a variety of actions upon an IP address change:

  • Sends an email (SSL support)
  • Updates a DynDNS host name
  • Executes a program
  • Logs the IP address to a file

Remember that we offer support for Gateway IP Monitor through our forums, and please do send us feedback.

Enjoy!