Trello is a simple yet powerful and innovative task management / collaboration platform for teams. With Trello, the developers have basically taken the familiar concept of traditional white boards where you add and remove tasks (by writing on them), and moved it to an easy-to-use online tool.
While Trello doesn’t attempt to replace the more complex project management and collaboration tools available (including its own FogBugz platform), it makes keeping track of small ToDo lists and tasks surprisingly simple, while still supporting advanced features such as due dates, attachments, assignments and more. Of course, Trello also includes a very capable mobile app for iOS and Android (I only tested the iOS version).

And best of all, it’s completely free if you stick with the basic (and for most people completely sufficient) functionality. But what does Trello have to do with EventSentry and cutting down on emails?
We’re always looking for innovative ways to make managing alerts easier and more productive, especially in larger teams. While email alerts certainly serve a purpose and can be quite useful, alerts dispatched via email suffer from a few disadvantages:
- Emails sent to multiple recipients make it difficult for the recipient to know whether the alert has been acted upon or not
- Alerts which have already been resolved by a team member still remain in your inbox
- Emails often get lost amidst other emails and potentially critical alerts may get overlooked
How Trello Works
Trello is organized into boards, each of which can have one or more lists, each of which have multiple cards. Since Trello offers an API, you can use EventSentry’s HTTP action to submit events (alerts) directly to one (or more) Trello lists.
And this is where the fun starts. Once in Trello, alerts (now cards, or “alert cards”) can be acted upon in a variety of creative and useful ways. You can:
- Receive alerts in your browser when a card is created
- Move a card to a different list (e.g. “Resolved”, “Under Investigation”, …)
- Assign one or more people to a card
- Add comments to a card
- Assign a due date to a card
- Mark a card as important (you can even define your own color codes)
- Receive periodic summary emails if you don’t visit the board
All of these features make managing alerts in teams with multiple SysAdmins much easier. When an alert comes in, anybody can act on it (e.g. add themselves) or assign it another team member. Any changes are immediately visible to all other team members in real-time (and we at NETIKUS love anything real-time).
Integrating EventSentry with Trello is a 3-step process:
- Sign up for Trello, create a board and customize the associated lists
- Get an API & access key & determine ID of your list
- Setup HTTP action in EventSentry and create/modify rules
Signing up for Trello
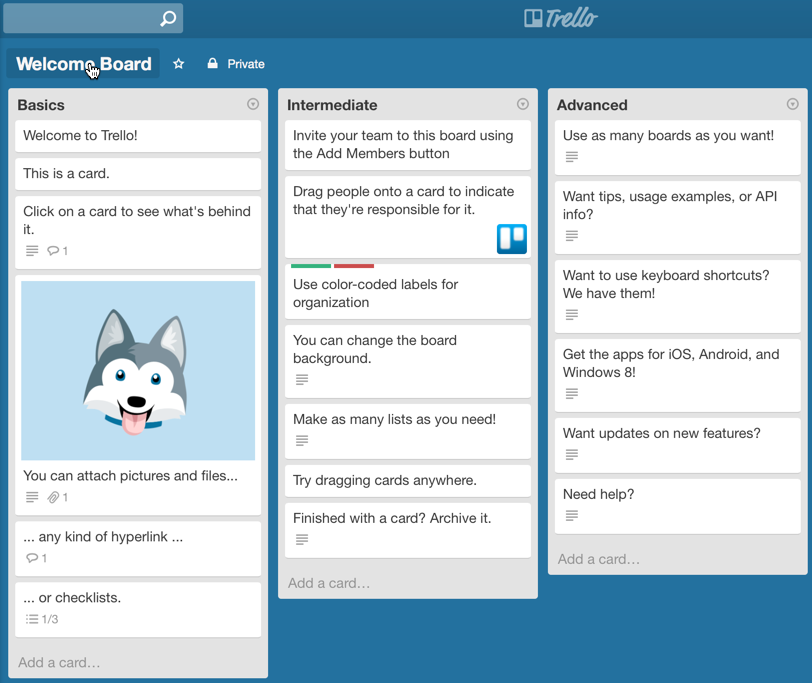
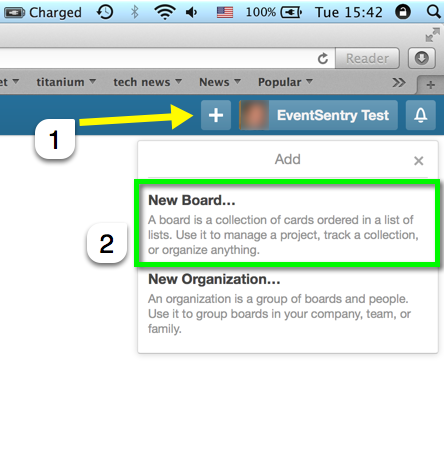
To get started, navigate to http://www.trello.com and sign up with an email address. After you log in for the first time, you will automatically get the “Welcome Board” which will show you all the things you can do with Trello. Since we don’t want to use the default board, we click the big PLUS icon on the top right instead and select “New Board”.

Give the board a descriptive name, e.g. “EventSentry Alerts”. Once created, the board will contain three default lists. You can either leave the list names as they are, or customize them as shown in the screen shot below. I chose “Active”, “Working on” and “Resolved”.

Getting an API and access key
Now that you’ve signed up, the next logical step is to get the API key so that EventSentry can start submitting events to Trello. So while you are logged in, navigate to https://trello.com/1/appKey/generate and note down (aka copy & paste) the first value “Key”, a 32 character-long hexadecimal value. This is the “main” key for your user account, and will be used whenever you (or EventSentry) make an API request.
The API key doesn’t actually let us access data from the boards, for which we’ll need an access key. There are different types of access keys with customizable expiration dates available, but in this case we’ll just get a read/write key without an expiration date. Navigate to the following URL to get a universal read/write access key and substitute APIKEY with the key you obtained just before:
https://trello.com/1/authorize?key=APIKEY&name=EventSentry&expiration=never&response_type=token&scope=read,writeYou will end up with a dialog similar to the one shown above, where you need to click the green “Allow” button. This will issue another hexadecimal key, this time 64 characters in length. Note this key down as well. Of course you can be less generous and issue keys which expire automatically, e.g. after 30 days. See the Trello docs for more details on the different “expiration” options available.
Getting the list ID
Our end goal is to submit cards to the “Active” list on our “EventSentry Alerts” board. In order to add a new card to this list however, we’ll need the list’s ID. Equipped with our main key and access key, we’re almost there. First, navigate to your “EventSentry Alerts” board in Trello (or whichever board you want to submit cards to) and note down the URL. For example, if the URL is https://trello.com/b/gePT9Wax/eventsentry-alerts, then you’ll want to extract the text between the /b/ and the board name, gePT9Wax in this case. Now, navigate to the URL below, and replace APIKEY with the API key, and ACCESSKEY with the access key:
This will return detailed results in JSON format similar to this:
{"id":"561e92617481e9a123aef3aff”,
 "name":"EventSentry Alerts”,
 "desc":”",
 "descData":null,
 "closed":false,
 "idOrganization":null,
 "pinned":true,
 "url":"https://trello.com/b/gePT9Wax/eventsentry-alerts”,
 "shortUrl":"https://trello.com/b/gePT9Wax”,
 "prefs”:  { ……… }
},
,"lists”:
[
 {"id":"561e92617481e9a123aef3b00","name":"Active","closed":false,"idBoard":"561e92617481e9a123aef3aff","pos":16384,"subscribed":false},
 {"id":"561e92617481e9a123aef3b01","name":"Working on","closed":false,"idBoard":"561e92617481e9a123aef3aff","pos":32768,"subscribed":false}, {"id":"561e92617481e9a123aef3b02","name":"Resolved","closed":false,"idBoard":"561e92617481e9a123aef3aff","pos":49152,"subscribed":false}
]
}
What we are interested in is the list id of our “Active” list, 561e92617481e9a123aef3b00 in the example above. With the last missing piece of the puzzle in our hands, we’re now ready to setup a HTTP action in EventSentry.
Configuring EventSentry
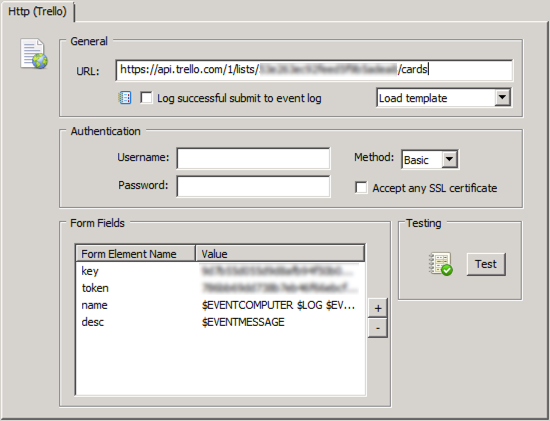
Right-click the actions container or utilize the ribbon to create a new HTTP action. In the action dialog, specify the following URL, replacing LISTID with the list id we just obtained:
In addition to the URL, we’ll need to specify at least 4 form fields:
key: APIKEY
token: ACCESSKEY
name: $EVENTCOMPUTER $LOG $EVENTSOURCE $EVENTCATEGORY $EVENTID
desc: $EVENTMESSAGE
The key and token fields need to be replaced with your API key and access key, whereas the name and desc fields can be customized to suit your needs: what I have shown above is just an example which should work reasonably well in most cases. You can add or remove other event variables as you wish. The upcoming v3.1 will include Trello in the template list to make this a bit easier.

Once the action is configured, click the Test button to ensure that all IDs have been specified correctly. If the test succeeds, then you should see a new card in the “Active Alerts” list in the EventSentry Alerts board.
Of course an action alone will not forward any alerts to Trello, so you will need to make some changes to your filters and packages. You can either modify existing filters / event log packages and replace the email action with the new Trello HTTP action, or add the Trello action to existing event log packages / filters. Remember that actions can be defined on a package-level through the package properties as well which can help save time.
Managing Alert Cards
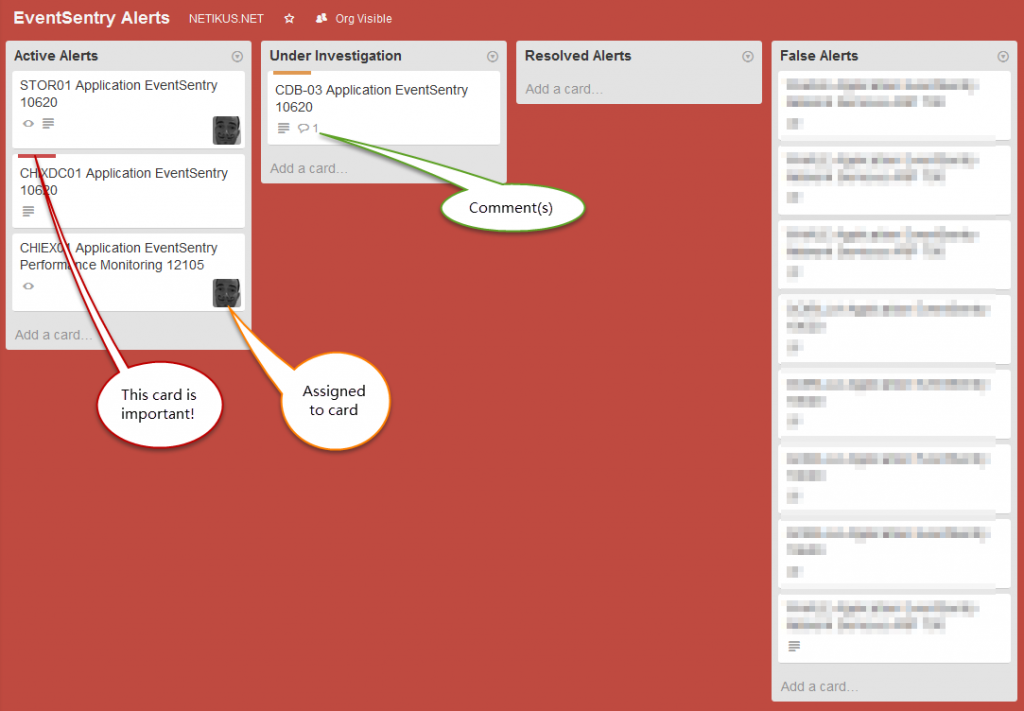
Once your first alert card arrives in the “Active” lists and is analyzed by a team member, a few actions can be taken:
- You can add a team member to the card, essentially assigning the alert to them. You can add multiple team members as well
- If the event is a false alert, it can be moved to a “False Alert” list, which would indicate that an exclusion filter should be setup in EventSentry
- You can assign a due date, if the alert requires a resolution by a specific date
- You can add a comment to the card
- You can label the card (e.g. “Important”)
- You can archive & delete the card

As you can see, despite its simplicity, Trello offers quite a few features to manage and collaborate. This ensures that alerts don’t disappear in an email inbox somewhere and instead are acted upon, while also allowing collaboration with comments, due dates and such.
Additional Tips & Tricks for Trello
In order to get alerted when a new alert card is created in the EventSentry Alert boards, you’ll need to subscribe to the board. This ensures that you will get a notification on your mobile phone, browser (when enabled http://blog.trello.com/how-to-use-trello-like-a-pro/) or email every time there is activity on a board. Activities include new cards being created, cards being moved to a different list, users being added to cards and so forth.
Note: You will not get a notification if the EventSentry Agent is submitting new cards while using your access key (only other users will see the alerts). This is because Trello assumes that you are creating the cards, and subsequently not notifying you about them.
One way to circumvent this restriction is to create a “service” account (e.g. eventsentry.yourcompany@gmail.com) and issue the access token under this user. Then, everybody will see the alerts.
But don’t stop there!
Of course you can use Trello for what it was originally designed to do as well – manage tasks. We’ve found it to be a great and easy way to handle ToDo lists for teams, resulting in more transparency and efficiency. Assigning a task is quick and easy, and team members can easily track progress with projects – without pesky emails floating around between team members.
Now you just have to get all your To-Do items actually done too. But at least I can now move my “Create Trello Blog Post” card into the “Done” list. And that feels good.